End Soggy Chicken Parm: Achieve the Crispiest Homemade Recipe
There are few dishes as universally beloved and satisfying as chicken parmesan. This Italian-American classic, with its tender chicken cutlets, vibrant tomato sauce, and blanket of melted cheese, holds a special place in the hearts of food lovers worldwide. Yet, despite its popularity, many home cooks (and even some restaurants!) struggle with a common pitfall: the dreaded soggy chicken parm. Imagine biting into what should be a crispy, golden-brown crust only to find it a limp, sauce-soaked mess. Disappointing, right?
The good news is that achieving the perfect crispy, melty, and utterly delicious homemade chicken parmesan is not only possible but often superior to what you'll find in many eateries. The secret lies not in fancy techniques, but in understanding a few key principles and making deliberate choices that prioritize texture as much as flavor. If you're ready to bid farewell to sad, soggy chicken and embrace a truly exceptional version, read on. We'll guide you through every step to ensure your next chicken parm is a crispy, cheesy triumph.
The Quest for Crunch: Why Restaurant Chicken Parm Falls Short
So, why do so many restaurant versions of chicken parmesan miss the mark? The primary culprit, as noted by many culinary experts, is an overzealous application of sauce and cheese. While generous portions might seem appealing, drenching the carefully breaded and fried chicken in a sea of marinara and a mountain of mozzarella almost guarantees a soggy outcome. The crisp coating, painstakingly achieved, becomes a mere memory under the weight and moisture of the toppings. It transforms into a "big soggy clump of chicken and cheese" rather than the harmonious blend of textures it should be.
Our goal with homemade chicken parm is to celebrate each component, allowing the crispy chicken to shine, complemented by just the right amount of sauce and a thoughtful blend of cheeses. This approach not only ensures a superior texture but also allows the individual flavors to stand out, creating a more balanced and enjoyable dish. This is your guide to creating Better Than Restaurants: Your Guide to Perfect Homemade Chicken Parm.
Mastering the Crispy Coating: Your Foundation for Success
The foundation of an outstanding crispy chicken parmesan begins long before it hits the oven. It's all about how you prepare the chicken and its protective, flavorful coating.
Pounding for Perfection and Even Cooking
- Even Thickness is Key: Start with boneless, skinless chicken breasts. The first crucial step is to pound them out to an even thickness, typically about 1/2-inch. Use a meat mallet or the flat side of a heavy pan. Focus on thinning the thicker parts down to match the thinner edges. This ensures the chicken cooks evenly, preventing dry spots and undercooked sections. It also creates a larger, more consistent surface area for your breading.
Seasoning Smart: Flavor from the Inside Out
- Don't Skimp on the Chicken: Season the chicken cutlets liberally with salt and freshly ground black pepper *before* breading. This is where the core flavor of the chicken develops.
- Skip Salting the Breading: Many recipes call for salting the flour or breadcrumbs, but this can lead to uneven seasoning or even burning, especially with the addition of Parmesan. Let the chicken itself be well-seasoned.
The Breading Brilliance: Panko and Parmesan Power
The breading process is your primary defense against sogginess and your ally in achieving ultimate crispness. You'll typically use a three-stage breading station:
- Flour: A light dusting helps the egg wash adhere.
- Egg Wash: Beaten eggs act as the glue for the breadcrumbs.
- Breadcrumbs with a Twist: This is where the magic happens.
- Panko for the Win: Ditch traditional breadcrumbs for panko. Panko breadcrumbs are larger, flakier, and absorb less oil, leading to a much crispier, lighter crust that stays crunchy longer.
- Parmesan Power-Up: Here's a secret weapon: mix finely grated real Parmesan cheese directly into your panko breadcrumbs. This not only adds an incredible depth of savory, nutty flavor but also contributes to an extra layer of crunch when fried. It's a game-changer!
Resting for Adhesion and Frying for Gold
- The 15-Minute Rest: After breading your chicken cutlets, let them rest on the counter for about 15 minutes before frying. This allows the moisture from the chicken to be absorbed by the breading, helping the coating to adhere firmly and prevent it from flaking off during cooking.
- Golden Brown Fry: Fry the breaded cutlets in hot oil (vegetable, canola, or grapeseed work well) until they are beautifully golden brown on both sides. This initial fry sets the crispness and color before the cutlets even hit the oven. You're not cooking them through here, just developing that irresistible crust.
The Art of Assembly and Baking: Preserving the Crunch
Once your chicken cutlets are perfectly prepped and fried, the assembly and baking stages are critical for maintaining that hard-earned crispness while bringing all the delicious flavors together.
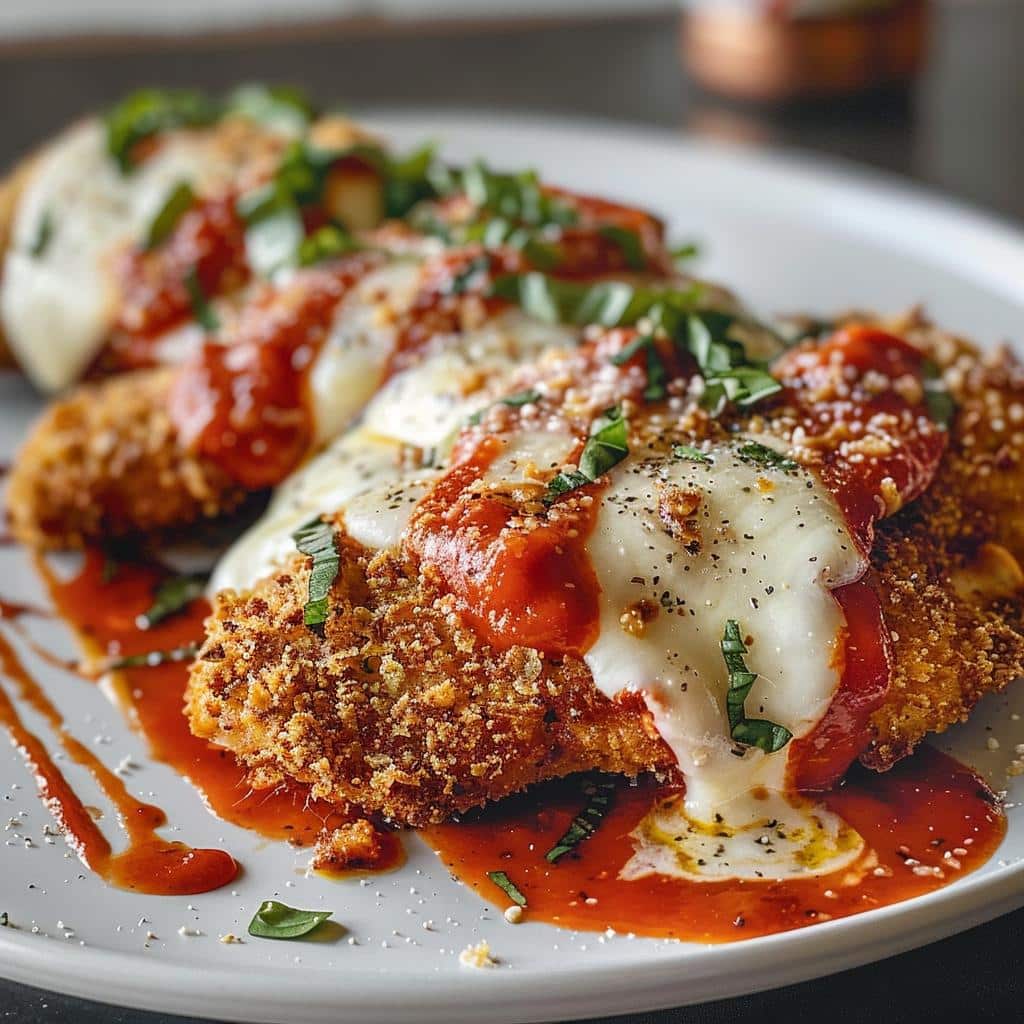
The Sauce Strategy: Less is More (Directly Underneath)
This is arguably the most critical tip for avoiding a soggy mess and achieving Crispy, Cheesy & Never Soggy: The Ultimate Chicken Parm Secrets. The common restaurant mistake is to lay the fried chicken cutlets directly onto a bed of sauce in the baking dish. This instantly compromises the crisp bottom crust.
- No Sauce Underneath: For maximum crispiness, avoid putting *any* sauce directly under the chicken cutlets in the baking pan.
- Minimal Top Application: Instead, place the chicken directly on the baking sheet (you can line it with parchment paper for easier cleanup). Add just a small amount of your favorite marinara sauce directly on top of each cutlet – enough for flavor, but not so much that it overwhelms the breading.
- Sauce on the Side: If you're a sauce lover, don't despair! Simply serve extra warm marinara sauce on the side for dipping. This allows everyone to customize their sauce-to-chicken ratio without sacrificing anyone's crisp cutlet.
The Perfect Cheese Medley: Beyond Just Mozzarella
While mozzarella is classic, a thoughtful blend of cheeses elevates the flavor profile and adds more complexity than just a single cheese. The reference notes that many versions only use mozzarella, but a mix is superior:
- Fresh Mozzarella: For that signature gooey, stretchy melt. Choose fresh, low-moisture mozzarella for the best results.
- Tangy Provolone: A layer of provolone adds a fantastic sharp, tangy counterpoint to the richness of the chicken and the sweetness of the sauce.
- Real Parmesan: Don't forget this namesake ingredient! A final sprinkle of real, freshly grated Parmesan over the other cheeses adds a salty, nutty, umami depth that is simply irreplaceable.
Hot Oven, Quick Bake: The Final Act
The oven temperature and baking time are your final allies in preserving and enhancing crispiness while ensuring the cheese melts beautifully.
- Preheat to Perfection: Ensure your oven is screaming hot – fully preheated to 450°F (230°C). A hot oven is essential for several reasons:
- It quickly crisps up any remaining breading that might have softened slightly.
- It rapidly melts and browns the cheese, creating those delicious bubbly, slightly charred edges without overcooking the chicken.
- The chicken, having been pre-fried, only needs a short blast of heat to finish cooking through and meld the flavors.
- Herbal Finishing Touch: Before baking, sprinkle a little fresh basil or oregano on top for an aromatic boost.
Beyond the Basics: Expert Tips for Next-Level Chicken Parm
- Quality Ingredients Matter: While technique is paramount, starting with good quality ingredients makes a difference. Use fresh chicken, a high-quality canned tomato for your sauce (or store-bought premium marinara), and authentic cheeses.
- Don't Overcrowd the Pan: Whether frying or baking, give your chicken cutlets space. Overcrowding can lower the oil temperature during frying, leading to greasy chicken, and inhibit proper air circulation in the oven, preventing even crisping and melting.
- Let it Rest (Again): After removing your chicken parmesan from the oven, let it rest for 5-10 minutes. This allows the chicken to reabsorb its juices, ensuring it stays tender and moist, and gives the cheese a moment to set slightly, making it easier to serve.
- Serving Suggestions: While chicken parm is often paired with pasta, consider serving your crispy masterpiece with a simple side of lightly dressed green salad to cut through the richness, or some crusty Italian bread for soaking up any extra sauce you serve on the side.
Conclusion
Say goodbye to disappointing, soggy chicken parmesan and hello to a homemade version that will truly impress. By focusing on even pounding, smart seasoning, the power of panko and Parmesan in your breading, a strategic approach to sauce, a thoughtful cheese blend, and a scorching hot oven, you'll achieve a dish that boasts tender, juicy chicken encased in a golden, undeniably crispy crust, smothered in perfectly melted cheese. This isn't just a meal; it's a testament to how simple tweaks can transform a beloved classic into something truly extraordinary. Get ready to enjoy the ultimate crispy chicken parm experience in the comfort of your own kitchen!
